How to install WordPress with Nginx

Nginx is popular because it offers numerous benefits when used with WordPress on a VPS. It supports reverse proxy, caching, load balancing, and more, making it a great fit for hosting a WordPress website. Nginx is known for its low memory usage, high concurrency support, and efficient handling of index and static files. It also solves scalability issues and addresses the C10K problem related to handling concurrent connections. With its robust architecture and superior performance, Nginx has become a preferred choice for hosting WordPress sites on VPS solutions.
Prerequisites
- A Linux server with ability to run commands as root (sudo). You can get ones cheaply on the cloud that you can then later pull down after testing. You can use the links below to get free trials on any of the cloud providers.
- Vultr - Get 100 USD in credits to try out in 30 days. Vultr also offers Windows Server VPSs at a cheaper cost and has tones of other operating systems to choose from as compared to Linode and Digital Ocean
- Digital Ocean - Get 200 USD in credits to try out in 60 days!
- Linode - Get 100 USD in credits to try out in 60 days!
- Microsoft Azure
- AWS
- Google Cloud Platform
- A domain with an A record pointing back to your server's public IP address.
Installing Nginx
Nginx is a web server that can also be used as a reverse proxy, load balancer, mail proxy and HTTP cache. The software was created by Russian developer Igor Sysoev and publicly released in 2004. Nginx is free and open-source software, released under the terms of the 2-clause BSD license.
There are several guides for installing nginx, depending on the operating system. We will be however using ubuntu for tis guide. Feel free to check out the guides for the other operating systems from the official documentation. Kindly note that Nginx offers both a community version and an enterprise version. We will be using the community version.
To install nginx on ubuntu 22.04 LTS, follow the following steps
Install the prerequisites:sudo apt install curl gnupg2 ca-certificates lsb-release ubuntu-keyring
Then run an update abd install nginx using :
sudo apt update
sudo apt install nginx
If you have the UFW (UncomplicatedFirewall) firewall enabled, you will need to allow connections to Nginx. It is recommended that you enable the most restrictive profile that will still allow the traffic you need.
If you haven’t configured SSL for your server, you will only need to allow regular HTTP traffic on port 80 by running sudo ufw allow 'Nginx HTTP'. Otherwise, you can run allow all Nginx traffic, like we will in this guide, since we will be setting up SSL certificates as well. To allow Nginx on UFW, run:sudo ufw allow 'Nginx Full'
Kindly note that you might experience issues with UFW on ubuntu if you install nginx from the official packages over distribution-provided ones. To check the status, run the following: sudo ufw status.
With the new firewall rule added, you can test if the server is up and running by accessing your server’s domain name or public IP address in your web browser on http://server_domain_or_IP. You should be ale to see the default nginx page.
Installing and Configuring MySQL Database
Now that we have a web server up and running, we will need to install the database system to store and manage data for your site. MySQL is an open-source relational database management system. To install MySQL on ubuntu, we will use: sudo apt install mysql-server. Feel free to check out the documentation of other systems from the official documentation.
When the installation is finished, it’s recommended that you run a security script that comes pre-installed with MySQL. This script will remove some insecure default settings and lock down access to your database system. Start the interactive script by running the following command:sudo mysql_secure_installation
When you’re finished, test if you’re able to log in to the MySQL console:mysql -u root -p
Since we haven't set a password yet for our root user, we will leave it blank when be prompted for a password. However, it is good practice to change the password for the root user once logged in. To achieve this, run the following once we are in the MySQL shell:ALTER USER 'root'@'localhost' IDENTIFIED WITH mysql_native_password BY 'MyNewPass';
mysql_native_password is deprecated. Use the following official guide to use the recommended way of changing the root password. Now, when logging in as root, you will be required to use the password that you set.Creating WordPress Database
Log in to the MySQL command using mysql -u root -p and supplying the password that we set earlier. Once logged in and provided with the MySQL console, run the following:
Create the WordPress database:CREATE DATABASE wordpress DEFAULT CHARACTER SET utf8 COLLATE utf8_unicode_ci;
Create a separate MySQL user account that we will use exclusively to operate on our new database. Creating single-purpose databases and accounts is a good idea from a management and security standpoint. Remember to choose a strong password here and also feel free to change the WordPress usernameCREATE USER 'wordpressuser'@'localhost' IDENTIFIED BY 'password';
Grant access to the database you created.GRANT ALL ON wordpress.* TO 'wordpressuser'@'localhost';
Once done, you can use the exit command to exit the MySQL shell.
Installing Additional PHP and PHP Extensions
Nginx requires an external program to handle PHP processing and act as a bridge between the PHP interpreter itself and the web server. This allows for better overall performance in most PHP-based websites, but it requires additional configuration.
You’ll need to install php8.1-fpm, which stands for “PHP fastCGI process manager” and uses the current version of PHP (at the time of writing), to tell Nginx to pass PHP requests to this software for processing. Additionally, you’ll need php-mysql, a PHP module that allows PHP to communicate with MySQL-based databases. Core PHP packages will automatically be installed as dependencies.To install the php8.1-fpm and php-mysql packages, run:
sudo apt install php8.1-fpm php-mysql
WordPress and many of its plugins leverage additional PHP extensions, and you’ll use a few more in this tutorial. Each WordPress plugin has its own set of requirements. Some may require additional PHP extension packages to be installed. Check your plugin documentation to discover its PHP requirements.
sudo apt install php-curl php-gd php-intl php-mbstring php-soap php-xml php-xmlrpc php-zip php-mysql
When you are finished installing the extensions, restart the PHP-FPM process so that the running PHP processor can leverage the newly installed features:sudo systemctl restart php8.1-fpm. If you get an error Failed to restart php8.1-fpm.service: Unit php8.1-fpm.service not found, you can reinstall the PHP-FPM by running sudo apt-get install php8.1-fpm.
Also, ensure that the service is enabled and started. You can do this by running the following commands:
sudo systemctl enable php8.1-fpm.service
sudo systemctl start php8.1-fpm.service
Installing and Configuring WordPress with Nginx
Configuring Nginx
When using the Nginx web server, we can create server blocks (similar to virtual hosts in Apache) to encapsulate configuration details and host more than one domain on a single server.
On Ubuntu 22.04, Nginx has one server block enabled by default and is configured to serve documents out of a directory at /var/www/html. While this works well for a single site, it can become difficult to manage if you are hosting multiple sites.
Instead of modifying /var/www/html, we’ll create a directory structure within /var/www for the your_domain website, leaving /var/www/html in place as the default directory to be served if a client request doesn’t match any other sites.
Create the root web directory for your_domain as follows:
sudo mkdir /var/www/your_domain
We then assign ownership of the directory with the $USER environment variable, which will reference your current system user:
sudo chown -R $USER:$USER /var/www/your_domain
Then, open a new configuration file in Nginx’s sites-available directory using your preferred command-line editor
sudo nano /etc/nginx/sites-available/your_domain
Copy the following contents into the file, making sure to replace the appropriate parameters:
server {
    listen 80;
    server_name your_domain www.your_domain;
    root /var/www/your_domain;

    index index.html index.htm index.php;

    location / {
        try_files $uri $uri/ =404;
    }

    location ~ \.php$ {
        include snippets/fastcgi-php.conf;
        fastcgi_pass unix:/var/run/php/php8.1-fpm.sock;
     }

    location ~ /\.ht {
        deny all;
    }

}
Activate your configuration by linking to the configuration file from Nginx’s sites-enabled directory:sudo ln -s /etc/nginx/sites-available/your_domain /etc/nginx/sites-enabled/
Then, unlink the default configuration file from the /sites-enabled/ directory:sudo unlink /etc/nginx/sites-enabled/default
Then, open the new configuration file in Nginx’s sites-available directory using your preferred command-line editor. Here, we’ll use nano:sudo nano /etc/nginx/sites-available/your_domain
Add a few location blocks within the main server block for fetching the favicon, robots.txt and static files (HTML CSS and JavaScript)
    location = /favicon.ico { log_not_found off; access_log off; }
    location = /robots.txt { log_not_found off; access_log off; allow all; }
    location ~* \.(css|gif|ico|jpeg|jpg|js|png)$ {
        expires max;
        log_not_found off;
Adjust the try_files list inside the location block by commenting out the default setting by prepending the line with a pound sign (#) and then add the code below. This way, instead of returning a 404 error as the default option, control is passed to the index.php file with the request arguments.
location / {
        #try_files $uri $uri/ =404;
        try_files $uri $uri/ /index.php$is_args$args;
Your final config file should look like this:
server {
    listen 80;
    server_name your_domain www.your_domain;
    root /var/www/your_domain;

    index index.html index.htm index.php;

    location / {
        #try_files $uri $uri/ =404;
        try_files $uri $uri/ /index.php$is_args$args;
    }

    location ~ \.php$ {
        include snippets/fastcgi-php.conf;
        fastcgi_pass unix:/var/run/php/php8.1-fpm.sock;
     }
    location = /favicon.ico { log_not_found off; access_log off; }
    location = /robots.txt { log_not_found off; access_log off; allow all; }
    location ~* \.(css|gif|ico|jpeg|jpg|js|png)$ {
        expires max;
        log_not_found off;
    }

    location ~ /\.ht {
        deny all;
    }

}
Check the configuration for syntax errors by typing: sudo nginx -t. If no errors were reported, reload Nginx by typing: sudo systemctl reload nginx
Downloading and Installing WordPress
For security reasons, it is recommended to get the latest version of WordPress directly from the project’s website. Change into a writable directory and then download the compressed release :
cd /tmp
curl -LO https://wordpress.org/latest.tar.gz
Extract the compressed file to create the WordPress directory structure, copy the wp-config-sample.php to wp-config.php and then move the entire directory into our document root that we created earlier.
tar xzvf latest.tar.gz
mv /tmp/wordpress/wp-config-sample.php /tmp/wordpress/wp-config.php
sudo cp -a /tmp/wordpress/. /var/www/your_domain
Assign ownership to the www-data user and group. This is the user and group that Nginx runs as, and Nginx will need to be able to read and write WordPress files in order to serve the website and perform automatic updates:
sudo chown -R www-data:www-data /var/www/your_domain
Configuring WordPress
We will need to edit the wp-config.php file and add our own secret values, different from the ones provided by default in the sample config file. WordPress provides a secure generator for these values so that you don’t have to come up with values on your own. Use the following command to generate random values:
curl -s https://api.wordpress.org/secret-key/1.1/salt/
Open the wp-config.php from your document root directory, find the section that contains the dummy values and replace the existing secure keys with the ones generated from the command above.
sudo nano /var/www/your_domain/wp-config.php
You also need to adjust the database name, the database user, and the associated password that was configured within MySQL setup above. You also need to set the method that WordPress uses to write to the filesystem to direct since you’ve given the web server permission to write where it needs to. Add the following line of code to the config file:
define( 'FS_METHOD', 'direct' );
Failure to set this with the current settings would result in WordPress prompting for FTP credentials when we perform some actions.
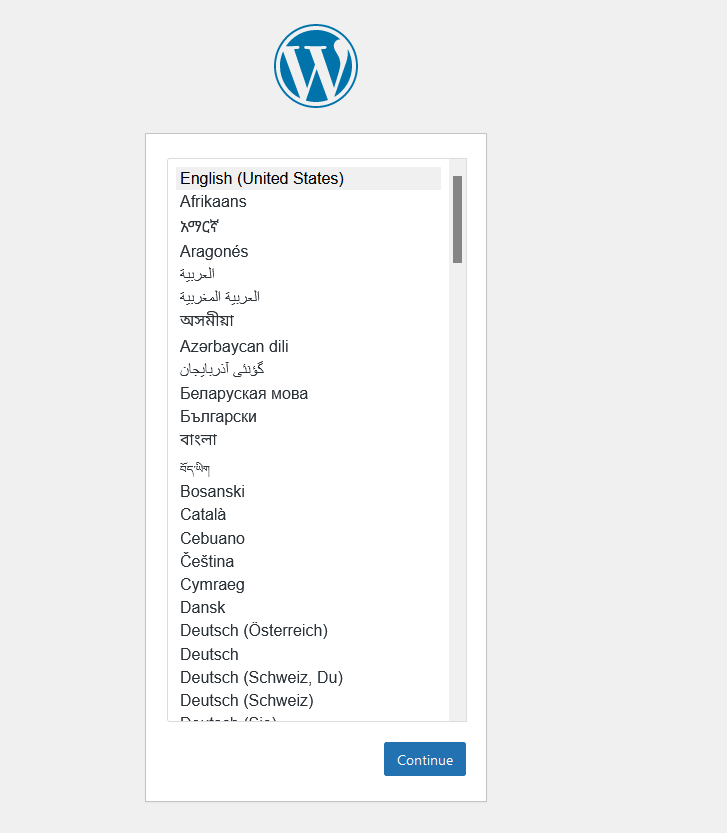
In your web browser, navigate to your server’s domain name or public IP address:
http://server_domain_or_IP
Select the language you would like to use:
Select a name for your WordPress site and choose a username (it is recommended not to choose something like “admin” for security purposes). A strong password is generated automatically. Save this password or select an alternative strong password. Enter your email address and select whether you want to discourage search engines from indexing your site:

Kindly note that we have not set up SSL Certificates for our domain yet, and we will do this in our next tutorial.