How to Harden Nginx: A Practical 2026 Guide
Server tokens, TLS config, security headers, rate limiting, bot blocking — the full Nginx hardening stack with current syntax and the OCSP stapling warning that most guides miss.
A default nginx install is functional. It's also fairly loud about what it is, doesn't send a single security header, and will happily serve every request a scanner throws at it until the machine buckles.
This guide covers the full stack: version disclosure, TLS, security headers, rate limiting, and bot blocking. There's also one important warning about OCSP stapling that most current guides still get wrong.
Hide the Version Number (and optionally the Server Header)
By default, nginx announces its version number in response headers and on error pages. A response might show Server: nginx/1.26.1. One line in the http{} block stops that:
server_tokens off;
After this, the header reads Server: nginx — no version. That's good enough for most sites. The version is gone; an attacker still knows you're running nginx, but they can't immediately target a known CVE for a specific release.
If you want the Server header gone entirely, that requires the headers-more module. On Debian/Ubuntu, apt install nginx-extras pulls it in. Then in http{}:
more_clear_headers Server;
Whether full header removal is worth the extra dependency is a judgment call. For a personal project or a low-profile site, server_tokens off is fine. For anything that gets scanned heavily, removing the header entirely reduces noise.
TLS Configuration
This is the Mozilla Intermediate profile, which is the right choice for most production sites — it supports TLS 1.2 and 1.3, drops all legacy cipher suites, and maintains broad browser compatibility. Add this to your http{} block or the relevant server{} block:
ssl_protocols TLSv1.2 TLSv1.3;
ssl_ciphers ECDHE-ECDSA-AES128-GCM-SHA256:ECDHE-RSA-AES128-GCM-SHA256:ECDHE-ECDSA-AES256-GCM-SHA384:ECDHE-RSA-AES256-GCM-SHA384:ECDHE-ECDSA-CHACHA20-POLY1305:ECDHE-RSA-CHACHA20-POLY1305:DHE-RSA-AES128-GCM-SHA256:DHE-RSA-AES256-GCM-SHA384:DHE-RSA-CHACHA20-POLY1305;
ssl_prefer_server_ciphers off;
ssl_ecdh_curve X25519:prime256v1:secp384r1;
ssl_session_timeout 1d;
ssl_session_cache shared:SSL:10m;
ssl_session_tickets off;
ssl_dhparam /etc/nginx/dhparam.pem;
Two things in here that are quite useful:
ssl_prefer_server_ciphers off — older hardening guides typically say to set this to on. Mozilla's current guidance says off for the Intermediate profile, letting clients negotiate the strongest mutual cipher they support. Trust the client to pick well.
ssl_session_tickets off — session tickets are an optimization for resuming TLS sessions, but they weaken forward secrecy if the ticket key isn't rotated regularly. Unless you've set up key rotation, off is safer.
Generate the DH params file before reloading nginx:
openssl dhparam -out /etc/nginx/dhparam.pem 2048
This takes a minute or two. Without the ssl_dhparam directive, DHE cipher suites are silently disabled — you won't get an error, they'll just be skipped.
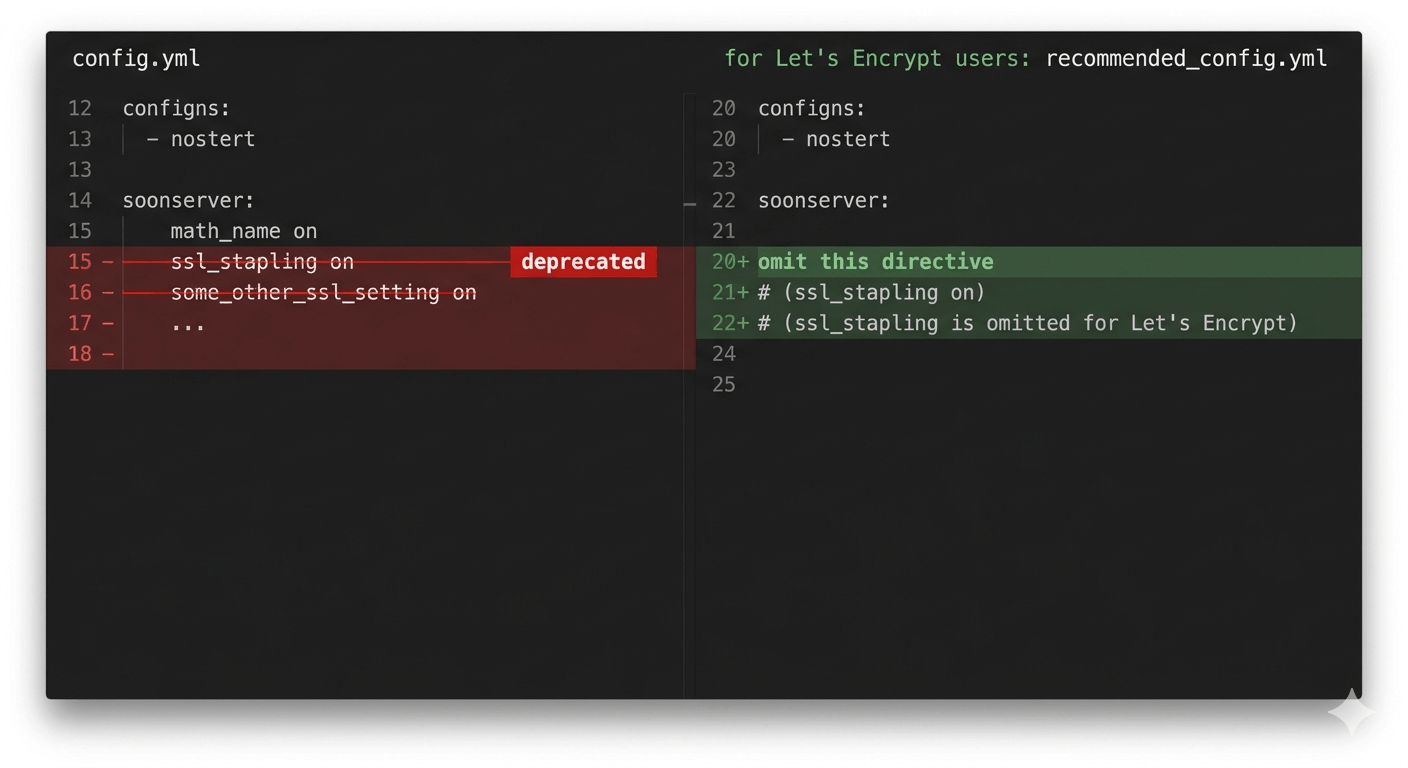
The OCSP Stapling Warning
If you're using Let's Encrypt, do not add ssl_stapling on. Let's Encrypt shut down its OCSP responder on August 6, 2025. OCSP URLs were removed from new certificates starting May 7, 2025. Adding the stapling directives to an LE config produces nginx warnings at reload and does nothing useful.
OCSP stapling still works if you're using a CA that still operates an OCSP responder. Let's Encrypt isn't one of them anymore.
Security Headers
These go in the server{} block. The always keyword is not optional — without it, headers are only sent on 2xx and 3xx responses. Error pages (which are exactly when you want these headers) won't get them.
add_header Strict-Transport-Security "max-age=63072000; includeSubDomains; preload" always;
add_header X-Frame-Options "DENY" always;
add_header X-Content-Type-Options "nosniff" always;
add_header Referrer-Policy "strict-origin-when-cross-origin" always;
add_header Permissions-Policy "camera=(), microphone=(), geolocation=(), payment=(), usb=()" always;
add_header X-XSS-Protection "0" always;
The X-XSS-Protection: 0 line looks wrong. It isn't. The old 1; mode=block value had a documented security flaw in Internet Explorer — it could be exploited to create XSS vulnerabilities rather than block them. Modern browsers either ignore the header entirely or have their own built-in XSS protections that supersede it. Setting it to 0 explicitly disables any broken legacy behavior in clients that still check it. Mozilla documents this explicitly and their recommendation is zero.
Adjust Permissions-Policy for your actual needs. If your site uses geolocation, remove that restriction. The list above is a conservative starting point.
Rate Limiting
The two directives work as a pair: limit_req_zone handles request rate; limit_conn_zone handles simultaneous connections. Both go in the http{} block. The actual enforcement goes in server{} or location{}.
# http{} block
limit_req_zone $binary_remote_addr zone=general:10m rate=10r/s;
limit_req_zone $binary_remote_addr zone=login:10m rate=5r/s;
limit_conn_zone $binary_remote_addr zone=conn_per_ip:10m;
$binary_remote_addr stores the IP as 4 or 16 bytes instead of a variable-length string — more memory-efficient than $remote_addr for the shared zone. The 10m allocates 10MB of shared memory, enough to track roughly 160,000 IPs.
Then in your server{} block:
location / {
    limit_req zone=general burst=20 nodelay;
    limit_req_status 429;
}

location /wp-login.php {
    limit_req zone=login burst=5 nodelay;
    limit_req_status 429;
}

limit_conn conn_per_ip 20;
burst=20 nodelay allows short spikes — a user loading a page that hits 12 assets simultaneously won't get throttled. nodelay processes the burst immediately rather than queuing requests, which avoids long response delays for legitimate users. The limit_req_status 429 returns the RFC-correct status code for rate limiting; the default is 503, which is technically wrong and can confuse monitoring tools.
Tune the rate and burst values for your traffic patterns. These are conservative defaults — a busy site with authenticated users may need to raise them.
Bot Blocking
The simplest approach requires no extra modules — just a map block and a conditional. Add this to http{}:
map $http_user_agent $bad_bot {
    default         0;
    ~*masscan       1;
    ~*zgrab         1;
    ""              1;
}
Then in your server{} block:
if ($bad_bot) { return 444; }
Return code 444 is nginx-specific — it closes the connection without sending a response. Scanners get nothing; they can't even confirm the server is running nginx. The empty user agent match ("") catches a significant chunk of automated scanners that don't bother setting one.
This is functional but manual. If you'd rather have a maintained list, nginx-ultimate-bad-bot-blocker currently blocks 683 bad bots and 7,108 bad referrers (version V4.2026.03.5845). It uses the same map directive approach, just with a much longer list and an auto-update script. Worth considering if you're running a site that gets regular scanner traffic.
If you went through the first 24 hours on a new VPS, you've already seen what those scan logs look like. This is how you stop them from wasting nginx worker cycles.
The Optional WAF Layer
ModSecurity adds a full application firewall on top of nginx — traffic is inspected against the OWASP Core Rule Set before it hits your application. Real protection, real cost.
One distinction that matters: the commercial NGINX Plus ModSecurity WAF module reached EOL on March 31, 2024. If you've seen guides referencing that module, they're describing something that's no longer supported. The open-source path is libmodsecurity3 combined with the ModSecurity-nginx connector, which is actively maintained.
The latency hit is roughly 1–5ms per request depending on which rules you enable and what your hardware looks like. For a site that handles user-submitted input or runs e-commerce, that's a reasonable trade. For a static blog or documentation site, it's probably not worth the operational overhead.
Layering With More Security Tools.
Nginx hardening covers the web layer. The firewall layer — restricting which ports are even reachable — is handled by UFW, which I covered in how to configure UFW firewall on Linux. For active threat intelligence and IP reputation blocking at the system level, CrowdSec integrates directly with nginx via a bouncer and handles bans automatically based on reported attacker IPs across the CrowdSec network.
These aren't redundant — they operate at different layers. UFW controls port access before a TCP connection completes. Nginx rate limiting and bot blocking operate once a connection reaches nginx. CrowdSec drops repeat offenders before they touch the stack at all.
The full picture is in the server hardening checklist if you want a single reference that covers all three layers together.